| Restocking Fee | No |
|---|---|
| Return shipping will be paid by | Buyer |
| All returns accepted | Returns Accepted |
| Item must be returned within | 30 Days |
| Refund will be given as | Money back or replacement (buyer's choice) |
| Brand | Autopart |
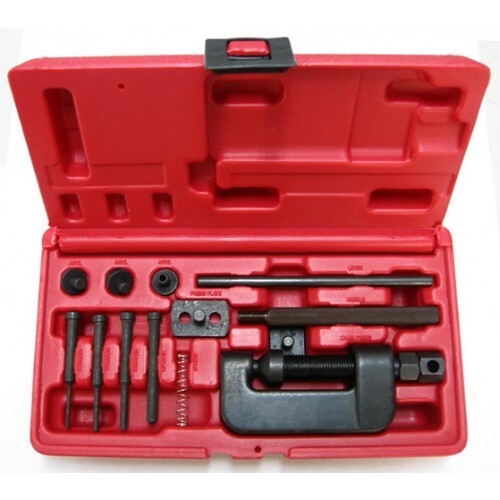
Check the listing for details. 8982 Large Chain Breaker. Condition: New. Listed at 97.92 USD. Will break chains from #35 to #530, including cam chains and drive chainsKit includes 3 anvils, 3 pins, riveter, spring, press plate, lever, handle and chain pressRecommended for light to medium duty useComplete with instructions and packed in blow-mold caseLarge Chain BreakerReplacement Pins:8982x02 = 2.2mm8982x03 = 2.9mm8982x04 = 3.8mm INSTRUCTIONS: For Breaking Chains: Applications: For chains from #35 to #530. Not recommended for heavy-duty type chains from #530 to #630 Note: If working on cam chains, and cover chain tunnel with rag to prevent parts from dropping down.Assemble handle and lever, as shown in diagram on back.Select correct size tip for chain type and add spring. Note: 2.2mm pin should be used on most cam chains. 2.9mm pin should be used on #25 or #35 chains. 3.8mm pin should be used on #428 to #530 chains (most motorcycle drive chains).Remove push bolt and drop tip & spring assembly inside alignment bolt, then replace push bolt. Note: If small 2.2mm tip is used, you must also use the upper and lower guides to prevent breaking tip. Upper guide threads on to alignment bolt, lower guide drops in place in bottom of tool body. Put tool over chain. Tool tip must be withdrawn at least 2mm into alignment bolt. End of chain rivet should be held into position in tool alignment bolt, with other end of rivet in hole in tool body. Tighten alignment bolt securely against chain.Tighten push bolt with 14mm wrench or lever until chain pin is pushed completely out. Chain pin will drop out of hole in bottom of tool. You may want to push both pins out. Note: When tightening push bolt against chain link pin, if you donΓÇÖt feel the tip going down smoothly, check that tip is correctly lined up against link pin. If not, repeat step 4 or you may break pin. For Installing chains: 1. Rivet tip and anvil must be in place in the tool. 2. Assemble chain with link to be riveted. Note: Special rivet link pins must be used. Using original pushed out pin is not recommended. Do not attempt to use clip-type connecting link. Pin must be all the way through the chain link. It can be tightened into place by placing chain into tool with tool tip withdrawn and tightening alignment bolt. 3. Position tool over pin to be riveted. Make sure tool tip is withdrawn and tighten alignment tool securely against chain. Tighten push bolt very tight so that rivet tip spreads chain pin. End of chain link pin should be flared so that pin is solidly held in place. Repeat procedure on other link pin. 4. Withdraw tool, remove chain and check that both chain link pins show same spread end marks. Rivets on side plate should be in alignment with side plates.
You may also like