| All returns accepted | ReturnsNotAccepted |
|---|---|
| Unit of Sale | Each |
| Assembly Status | Parts & Kits |
| Color | Various |
| Scale | Does Not Apply |
| Material | ABS |
| Set Includes | Customer Selected Parts |
| MPN | Does not apply |
| Item Length | Various |
| Age Level | 10 and up with Adult Supervision. |
| Franchise | Does Not Apply |
| Subject | Novelty |
| California Prop 65 Warning | WARNING: This product contains one or more chemicals known to the State of California to cause cancer and birth defects or other reproductive harm. |
| Vintage | No |
| Brand | Crafted CMP |
| Type | Sport |
| Skill Level | 2 – Easy |
| Item Height | Various |
| Model | Snack Can |
| Theme | Snack Can Novelty Rockets |
| Features | Does Not Apply |
| Country/Region of Manufacture | United States |
| Unit Quantity | 1 |
| Item Width | Various |
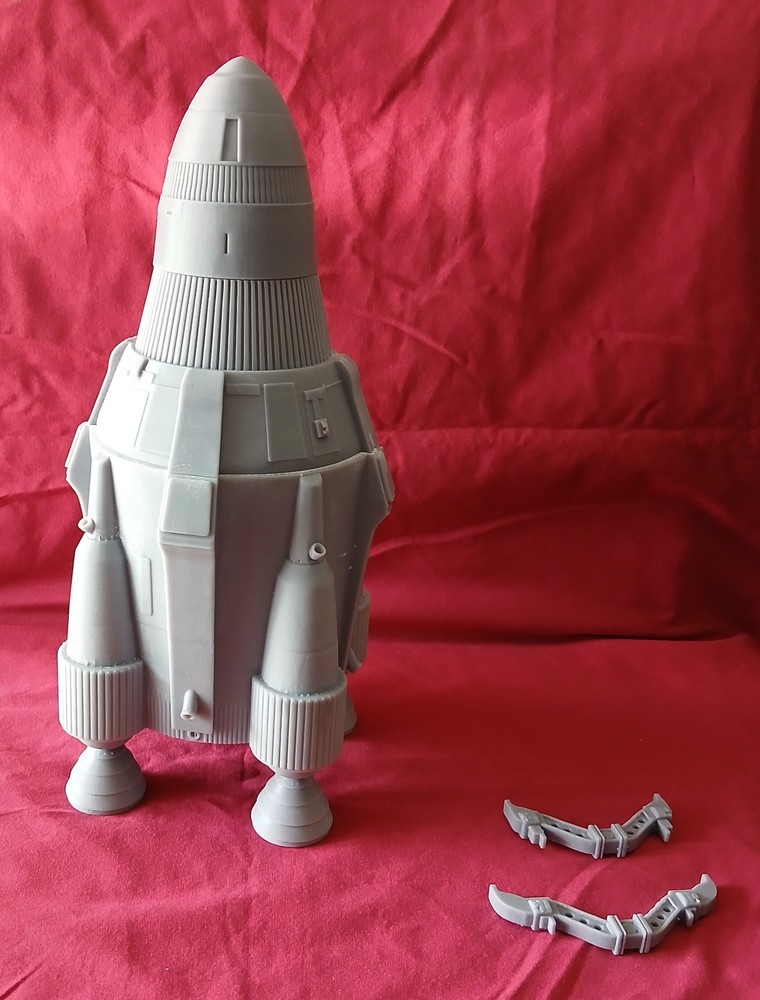
Check the listing for details. Snack Can FLYING MODEL ROCKET Parts Kit Pringles Cheetos Smart Chips Doritos. Color: Various, Condition: New. Listed at 59.00 USD. Be sure to read PHOTO KEY and all of this listing before purchasing. You are buying only the ABS parts needed to complete your own scratch-built Snack Can Rocket. Snack Can Rocket Madness. High-quality ABS Additive Manufacturing parts. Real Flying Model Rocket for your recreational enjoyment and STEM activities. Provide your own favorite snack can, parachute, motor and launch rig. Build your Rocket! Needed to complete:Motor, parachute, launchpad, launch controller and safe launch location. Common sense, legal and operational safety are provided by you. Parts fully designed by me and produced in my workshop. Specifications: Weight: 150 to 210g (using a single can) Flights to: 300 to 350' altitude expected. Recommendations:Motor: Estes D12-3 Parachute: Estes or builder constructed 12 to 18".Ribbon Recovery Possible: Yes, 72".Tumble Down Recovery Possible: Yes although risk of model damage is greater. Winds: 10mph or less Launch rod length: 36" Launch Lug Choice: 1/8", 3/16" and 1/4" Provide your own snack can of choice. I have tested all Pringles, Cheeto's, Doritos and Smart Chips cans available in my area. Pringles currently come in 2.3-, 5.5- and 7.1-ounce sizes. It is presumed the buyer is familiar with standard model rocket construction and rigging techniques and this Snack Can Rocket is not your first model rocket project. Instructions below are not exhaustive and all that are included with this product. See my YouTube channel (Crafted: Search Crafted Model Rocket) for videos of Snack Can Rockets and construction video(s). Most of these videos are under "Live" due to live streaming. This is a scratch builders project to be customized by you. INSTRUCTIONS: 1: Remove lid - eat chips. 2: Remove steel bottom: Circulate a fresh sharp utility or hobby knife around and around the steel can bottom guiding blade firmly against the crimp. 3: Clean inside of can with damp cloth or Clorox Wipe to remove food oils being careful not to expose the cut bottom edge to moisture. 4: Using the edge of a utility or hobby knife, scrape the edges of parts to remove any burrs or sharp edges from additive manufacturing process. 5. Test fit the Fin Can (holds fins and motor). Consider where you'd like to line up the fins and where you will be gluing on the lug. I like to posirion the lug on the Nutrition/Ingredients side of the can. Align the fin can so the fins do not interfere with the launch lug/launch rod path. 6: Using a light amount of E6000, Zap Goo, Shoe Goo or similar, glue the motor can in the bottom of the snack can. I put a thin smear inside the snack can tube about 1/8" above the lower edge and the same on the outside of the Fin Can near the top. Push it in with a twisting motion to achieve a nice even smear in the joint. Wipe off any glue that squishes out. Leave till cured. (For the really short 2.3 ounce snack can, read and complete step 9 before gluing in fin can.)7: For short cans, the launch lug should be 1/4 to 1/2" above the bottom of the snack can. Standard and Party cans about 2" above the bottom edge. Apply glue to the Launch Rod Lug and stick to the can. Secure with 2 rubber bands. Check and adjust alignment. Leave till cured. 8: Trial fit your fins first. Apply a thin smear of glue to the fin slots on the fin can. A very thin smear on the edge of the fin where it will first enter the Fin Can slots. Push the fins in. it is not necessary to glue the fins in the short section overlapping side of the can. Monitor this joint and keep resetting the Fins to full depth in the fin can slots to assure the glue sets up while fins are fully seated. This may require a few minutes. 9: Standard 5.5oz cans and taller: Tie the length of Kevlar cord to the Parachute Stop Ring (outside edge of a spoke) securing the knot with some glue. Mark a dowel with tape about 5". Put glue on the dowel and wipe to inside of can just above the 5" point. Push the stop ring down into the can evenly using the dowel as a pusher and gauge to get it 5" below the top rim. Add some small dabs of glue at the top edge of the ring. Allow to cure. (Parachute Stop Lug Ring is not used on the 2.3-ounce short cans. Tie line to anchor in top of fin can.) 10: Install swivel on other end of your Kevlar shock cord. Attach your parachute lines to the other end of the swivel. Attach your cone to the swivel with a very short section of line. 11: The cone may need a section of tape to adjust for a snug fit when installed in the top of the snack can. You should be able to pick up the rocket from the cone without it pulling loose when everything is adjusted properly. 12: Bend the small paperclip as a motor retainer as shown in photo's 5 through 12. Snaps into motor retainer slot which includes a hole to depress the clip and release it as show in photo 9. Optionally, a layer of tape may be applied to the motor to make it tight in the hole. The purpose is to retain the motor in the rocket when the parachute ejection charge fires. This is necessary to assure enough pressure for nose cone and parachute to successfully deploy. 13: Read and follow all the National Association of Rocketry (NAR) safety rules including safe site selection, adult supervision, weather and other safety practices. Do not launch near high tension lines, where the rocket may land on people or damage property. Do not launch in high winds. Leave the area cleaner than when you found it. Go have fun! Photo Key: The first 4 photos are examples of Snack Can Rockets in my fleet each made from a parts kit being offered in this listing. Photos 5 thru 12 show steps modifying a paperclip into a simple motor retainer. The clip snaps into the rectangular slot on the bottom of the fin can. Warranty: All parts are guaranteed to be of good quality and implementable with the above snack cans for your own custom projects. If any part is found to be defective, it will be replaced. Parts are not returnable or refundable. Life is short, this is a small side business in a hobby I enjoy. I produce these kits only to those seeking fun and entertainment of model rocketry, a wonderful STEM related activity. If this is you, fantastic! Send me cool photos of your build and launches. If used in my listings, they earn discounts on a future purchase.
You may also like